Member Management
Invite, manage, and control seat-based access for your workspace
Member management lets admins invite users, assign roles, control who holds a paid seat, and export member data.
Roles
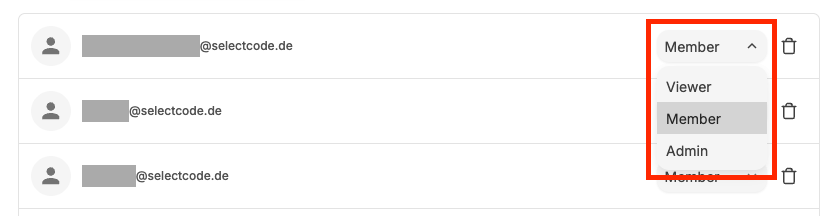
Every workspace member has one of three roles — Admin, Member, or Viewer — which determine what they can use and whether they consume a paid seat. See Roles & Access Model for the full permissions breakdown.
Changing a member's role
To change a role, click the role dropdown next to a member's name and select the new role. The change takes effect immediately.
Note
Changing a member's role between Admin and Member reassigns seat status automatically. Demoting someone to Viewer releases their seat, so it is available again. The number of paid seats in your subscription does not decrease automatically as a result. To reduce it, see Reduce the number of seats in your subscription.
Seat management
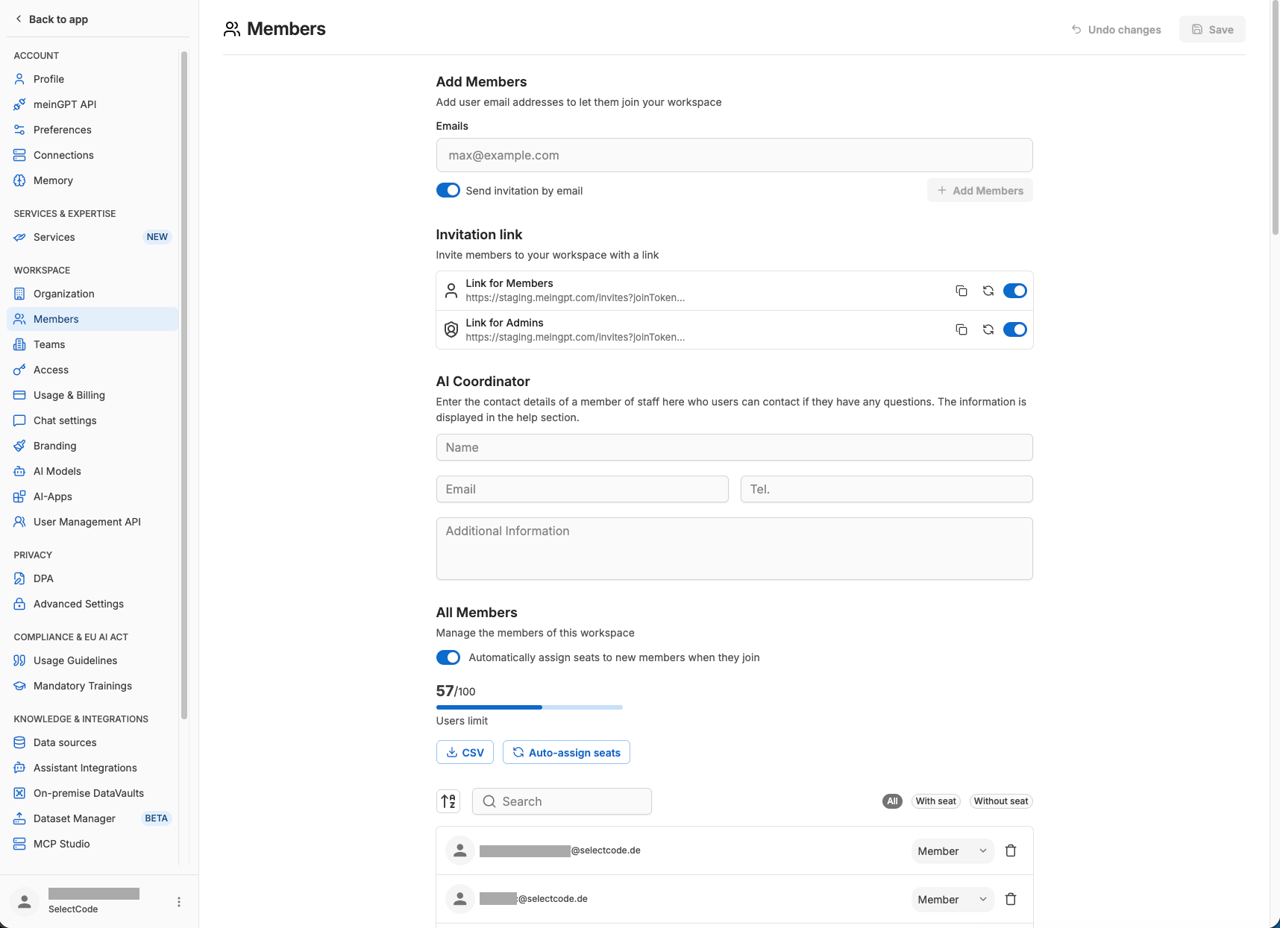
Your workspace has a fixed number of seats included in your plan. Only users with a seat (Admins and Members) can use AI features. The current seat usage is shown as a progress bar in the member management section (e.g. 12 / 25).
Auto-assign seats for new members
A toggle in the member settings controls whether new users who join the workspace are automatically assigned a seat and the Member role.
- Enabled (default): every new user who joins via invitation or invite link is automatically granted a seat and becomes a Member — as long as seats are available.
- Disabled: new users join as Viewers without a seat. An admin must manually change their role to Member or Admin to grant a seat.
The same toggle also applies to users created via SCIM provisioning from Entra ID.
This is useful when you want to control costs or review new members before granting AI access.
Tip
When rolling out to a larger group, consider disabling auto-assign first and then assigning seats deliberately — this prevents seats from being consumed by people who haven't been actively onboarded yet.
Assign seats to existing viewers

If auto-assign is disabled or was turned on after users already joined as Viewers, you can bulk-assign seats using the Assign seats button in the toolbar. This promotes all current Viewers to Members, filling available seats on a first-come basis.
Purchasing additional seats
Business Subscription
Go to Settings > Usage & Billing > Upgrade now. In the modal that opens click on Manage Subscription. You'll be forwarded to Stripe where you can increase or decrease the number of seats in your subscription
Enterprise Subscription
Contact your account manager to increase or adjust the number of seats in your subscription.
Reduce the number of seats in your subscription
The number of paid seats only changes when you adjust it in the subscription itself. Demoting members to Viewer is not enough: it frees seats but does not lower the number of seats you are billed for.
Release seats
In member management, demote everyone who no longer needs a seat to Viewer.
Turn off automatic seat assignment
Disable the Automatically assign seats to new members when they join toggle while your subscription still contains more seats than are in use. Otherwise free seats can automatically be handed back to existing Viewers.
Reduce the seat count in your subscription
Business subscription: Settings > Usage & Billing > Upgrade now > Manage Subscription — reduce the number of seats in Stripe. Enterprise subscription: contact your account manager.
A reduction cannot be scheduled separately for the end of the billing period in MeinGPT. Contract term and notice periods follow your contract.
Inviting members
There are three ways to add new users to your workspace:
| Method | Description |
|---|---|
| Email invitation | Enter one or more email addresses directly. The Send invitation by email switch lets you optionally skip the automatic email — the invitation is still created, but you'll need to notify the user another way. |
| Invite link | A shareable link for larger groups. There are separate links for Members and Admins — make sure you share the right one. Links can be regenerated at any time; the previous link becomes invalid immediately. |
| Email domain | All users with a matching domain join automatically (see below). |
Attention
Never share the plain workspace address (e.g. app.meingpt.com/<your-workspace-id>) as an invitation. This URL is not a join link - for a user who isn't already a member, it leads to a new, personal account instead of joining your workspace. Always use an email invitation, the invite link, or email-domain auto-join instead.
Limits on email invitations
The number of email invitations you can send depends on your subscription. These limits apply only to the Email invitation method; invite links and email-domain auto-joins are not affected.
| Subscription | Limit |
|---|---|
| Trial | Up to 10 invitations total, for the lifetime of the trial |
| Business | Up to 50 invitations per day, resetting daily |
| Pilot and Enterprise | No limit |
When a limit is reached, the invitation form shows the remaining quota and blocks further attempts.
Duplicate registration
If a user accidentally tries to register a second time with the same email address, no duplicate account is created. They are automatically signed into their existing account.
Email domain auto-join
You can link a company email domain (e.g. @yourcompany.com) to your workspace. When a new user signs up with an email address matching that domain, they are automatically added to your workspace — no manual invitation required. Combined with the auto-assign seats toggle, new employees can get full AI access the moment they create their account.
See Allowed email domains for details on domain configuration.
Removing members from workspace
You can remove members from workspaces. This does not delete their account on the platform.

Searching and filtering
The member list provides tools to quickly find specific users:
- Search — type a name or email address to filter the list in real time.
- Sort — toggle between ascending and descending alphabetical order.
- Seat filter — switch between All, With seat (Admins and Members), or Without seat (Viewers) to narrow the list by seat status.
Active filters also apply to the CSV export, so you can combine a search or filter with the download to get a targeted extract.
Member page
Clicking a name in the member list opens that member's page. It shows in one place:
- since when the person has been in the workspace and when they last signed in,
- their role and usage group, which you can also change here,
- their teams, which rules for models, apps and permissions decide on,
- What may … do?: which models and features the person can use, what is restricted, why, and where you change it. Anything switched off in the workspace applies to everyone alike and is folded away at the end.
If a team rule sits on a model that is switched off in the workspace, the page says so: the rule only applies once you switch the model on. For more on rules, see Permissions.
AI Coordinator
Admins can set a workspace AI Coordinator that is visible to all members. This typically identifies the company internal employee or help-desk contact. Fields include name, email, phone, and additional notes.
CSV export
The CSV button in the member list toolbar downloads a file containing the currently displayed members (respecting any active search or seat filter). The file includes the following columns:
| Column | Description |
|---|---|
id | Internal user ID |
email | Primary email address |
firstName | First name |
lastName | Last name |
isAdmin | yes if the user is a workspace admin, otherwise no |
hasSeat | yes if the user holds a seat (Admin or Member), otherwise no |