Translator
Translate texts and files into different languages using AI
Note
For admins: You can connect your own DeepL API key to have billing go directly through DeepL. Learn more at Translation Settings.
Introduction
The translation feature on the MeinGPT platform allows you to quickly and precisely translate texts and files into many languages. You can either copy and paste texts directly or upload files in various formats and have them translated into your desired language. The translated files are then available for download.
Engine, Hosting, and Data Protection
Without your own API key, MeinGPT uses Google Cloud Translate for text translations and DeepL for file translations by default. Both run via EU endpoints. If you add your own DeepL key (see below), DeepL is used for both translation types instead.
Text translations, including the original text, are stored permanently in your translation history until you delete them individually or clear the history (see below). File translations are also stored: both the uploaded source file and the translated file are kept encrypted in storage. Unlike text, there's currently no view in the interface for browsing or deleting individual files yourself - they're removed when your account or workspace is deleted.
Step-by-Step Guide
Open the translation feature
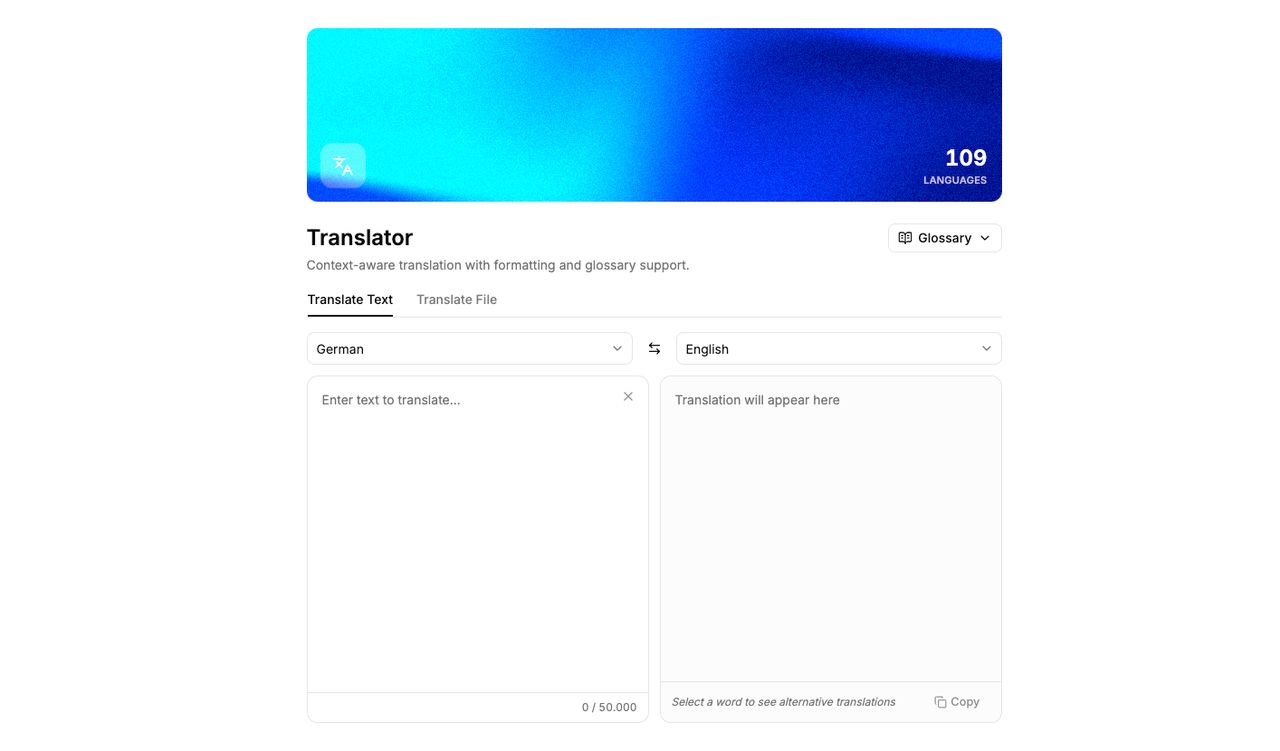
Go to Apps in the sidebar and select Translator. The page header shows how many languages and glossaries are available in your workspace.
Choose between text and file translation
Decide whether you want to translate a text or a file.
Translate text:
: Ideal for quick copy+paste translations of individual text sections or shorter content.
Translate file:
: Optimal for uploading complete documents in and translating them entirely - the original document's layout and formatting are preserved.
Note
If document translation isn't enabled for your workspace, you'll only see the text option and no tabs at all.
Select the language(s)
For text, choose the language to translate into, and optionally set a specific source language — it defaults to automatic detection.
For a file, you only choose the language to translate into (Translate into); the file's source language is always detected automatically and can't be set manually.
Select a glossary (Optional)
If your workspace has glossaries, a Glossary button sits next to the language selection. Open it and pick one from the list to have its terms applied to this translation, or leave it on None.
Attention
Glossary entries are matched by exact word form. An entry only applies when the word appears in the text exactly as stored in the glossary. Inflected forms such as plural or genitive (e.g. "Sicherungskastens" for the entry "Sicherungskasten") are treated as separate words and are not applied automatically. So add each form that occurs in your texts as its own entry - for example "Sicherungskasten", "Sicherungskästen", and "Sicherungskastens" with the same translation.Insert text or upload file
Depending on your selection in Step 2:
Translate text
- Copy the text you want to translate and paste it into the source field.
- Translation starts automatically as you type. Once it's done, click any word in the translated text to see alternative translations.
- To decide yourself when text is sent, open the gear next to the language selection and switch off Translate automatically under General. Nothing is then sent until you click Translate.
- If you leave the Translator page and come back later, your text and translation stay exactly as you left them - nothing is automatically retranslated.
Translate file
Attention
Supported file formats for translation are:.docx, .doc, .pptx, .ppt, .xlsx, .xls, .pdf, .htm, .html, .txt, .srt, .xlf, .xliff.- Drag the desired file into the upload field or click the field to select a file from your file system (e.g., Finder or Explorer).
- Click Translate to start the translation — a progress bar shows while it's running.
- Once the translation is complete, the file downloads automatically — unless you switched off Download documents automatically under General in the gear menu. You can download it again at any time from the same view.
Translation history
Every text translation you make is saved. Click History next to the language selection to browse your recent translations.
- Open in editor — loads the original text back into the text panel and clears the result panel rather than replaying the old result. With Translate automatically on, it retranslates right away using your current settings (glossary, languages); otherwise you start it yourself with Translate.
- Copy — copies the translated text directly, without reopening it.
- Delete a single entry, or Clear history to remove everything at once (with a confirmation step).
Note
History covers text translations only — file translations aren't listed here.
Managing glossaries
Glossaries themselves — creating, editing, importing, and deleting — are managed separately from picking one for a translation. Open the Glossary button next to the language selection and choose Manage glossaries (workspace admins only) to get to the glossary settings.
Create or edit a glossary
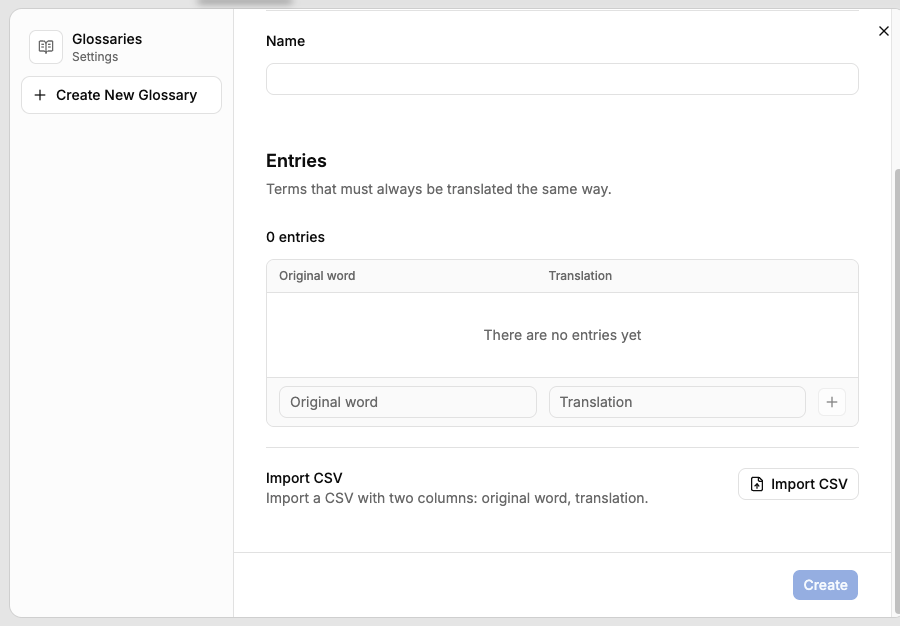
The settings window lists every glossary in your workspace on the left. Pick one to edit it, or create a new one. Each glossary has its own source and target language — it only applies to translations running in that exact direction.
Add entries
Add entries one at a time (original word + translation), or import many at once via Import CSV — a two-column file with the original word in the first column and the translation in the second.
To keep a term exactly as it is — a product or brand name, say — switch on the Don't translate lock in its row. The translation is set to the original word.
Delete a glossary
Select the glossary and click Delete below the term list. To confirm, type the glossary's name — a single click is not enough. The glossary is removed for everyone in the workspace; translations you already made keep their wording.
Troubleshooting
File translation fails or shows an error
Translating a file takes noticeably longer than translating text - the file is uploaded, translated, and downloaded again, and large or complex documents can take a while. If a file translation fails, shows an error, or gets stuck:
- Try again. A single attempt can fail due to a temporary issue with the translation provider.
- Check that the PDF contains real, selectable text. Scanned or image-only PDFs (no extractable text layer) can't be translated - run the file through OCR first, or export it again from its original source as a text-based PDF.
- Try a smaller or simpler file, or split a very large document into parts.
- If the problem keeps happening with the same file, contact your workspace admin or MeinGPT support and mention the exact error and the file - it helps us pinpoint what's failing.
Note
Maximum file size depends on the format: 30 MB for Word, PowerPoint, Excel, and PDF files; 10 MB for XLIFF; 5 MB for HTML; 1 MB for plain text and SRT subtitle files.