Create and Run Workflows
Create and use workflows for yourself and your colleagues
Hinweis
Workflows on the meinGPT platform allow you to automate recurring tasks and make processes more efficient. A workflow is a sequence of predefined steps executed by the AI to solve complex tasks in a structured way. Each workflow can be customized individually – from selecting the appropriate AI model to defining specific variables and documents. This flexibility allows you to precisely adapt the workflows to your team's or company's requirements and save time and resources.
Tipp
With workflows, you can map standardized tasks such as creating reports, analyzing data, or summarizing information in clear, structured processes. Each step of a workflow can access different models and inputs, allowing optimal use of the various AI models' strengths.
Creating Workflows
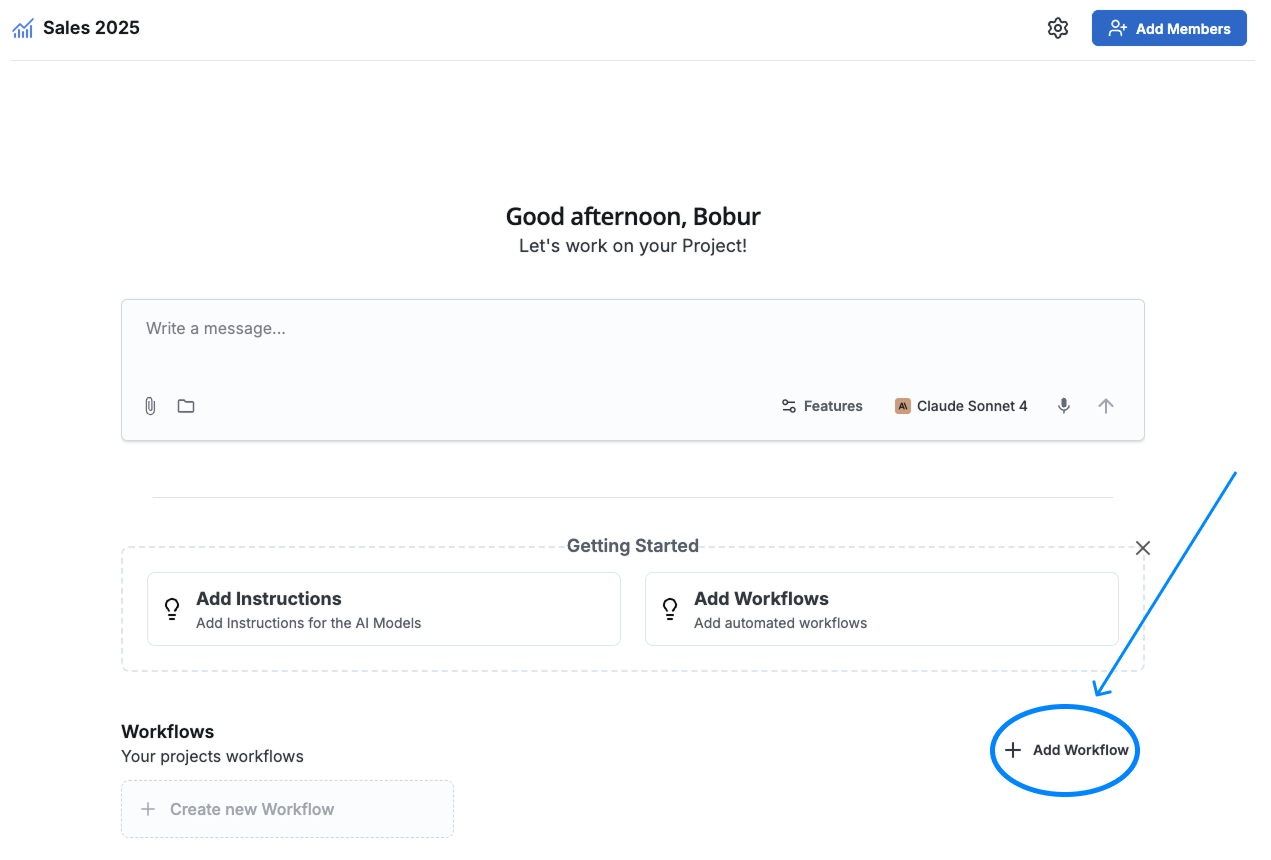
Add Workflow
In a project you'll find the Workflows section. Click on "Add Workflow" to create a new workflow and displays the option to select the creation method.
You have the option to create the workflow either with AI or manually. For this guide, we choose manual to go through the detailed workflow configuration steps.
Name Workflow
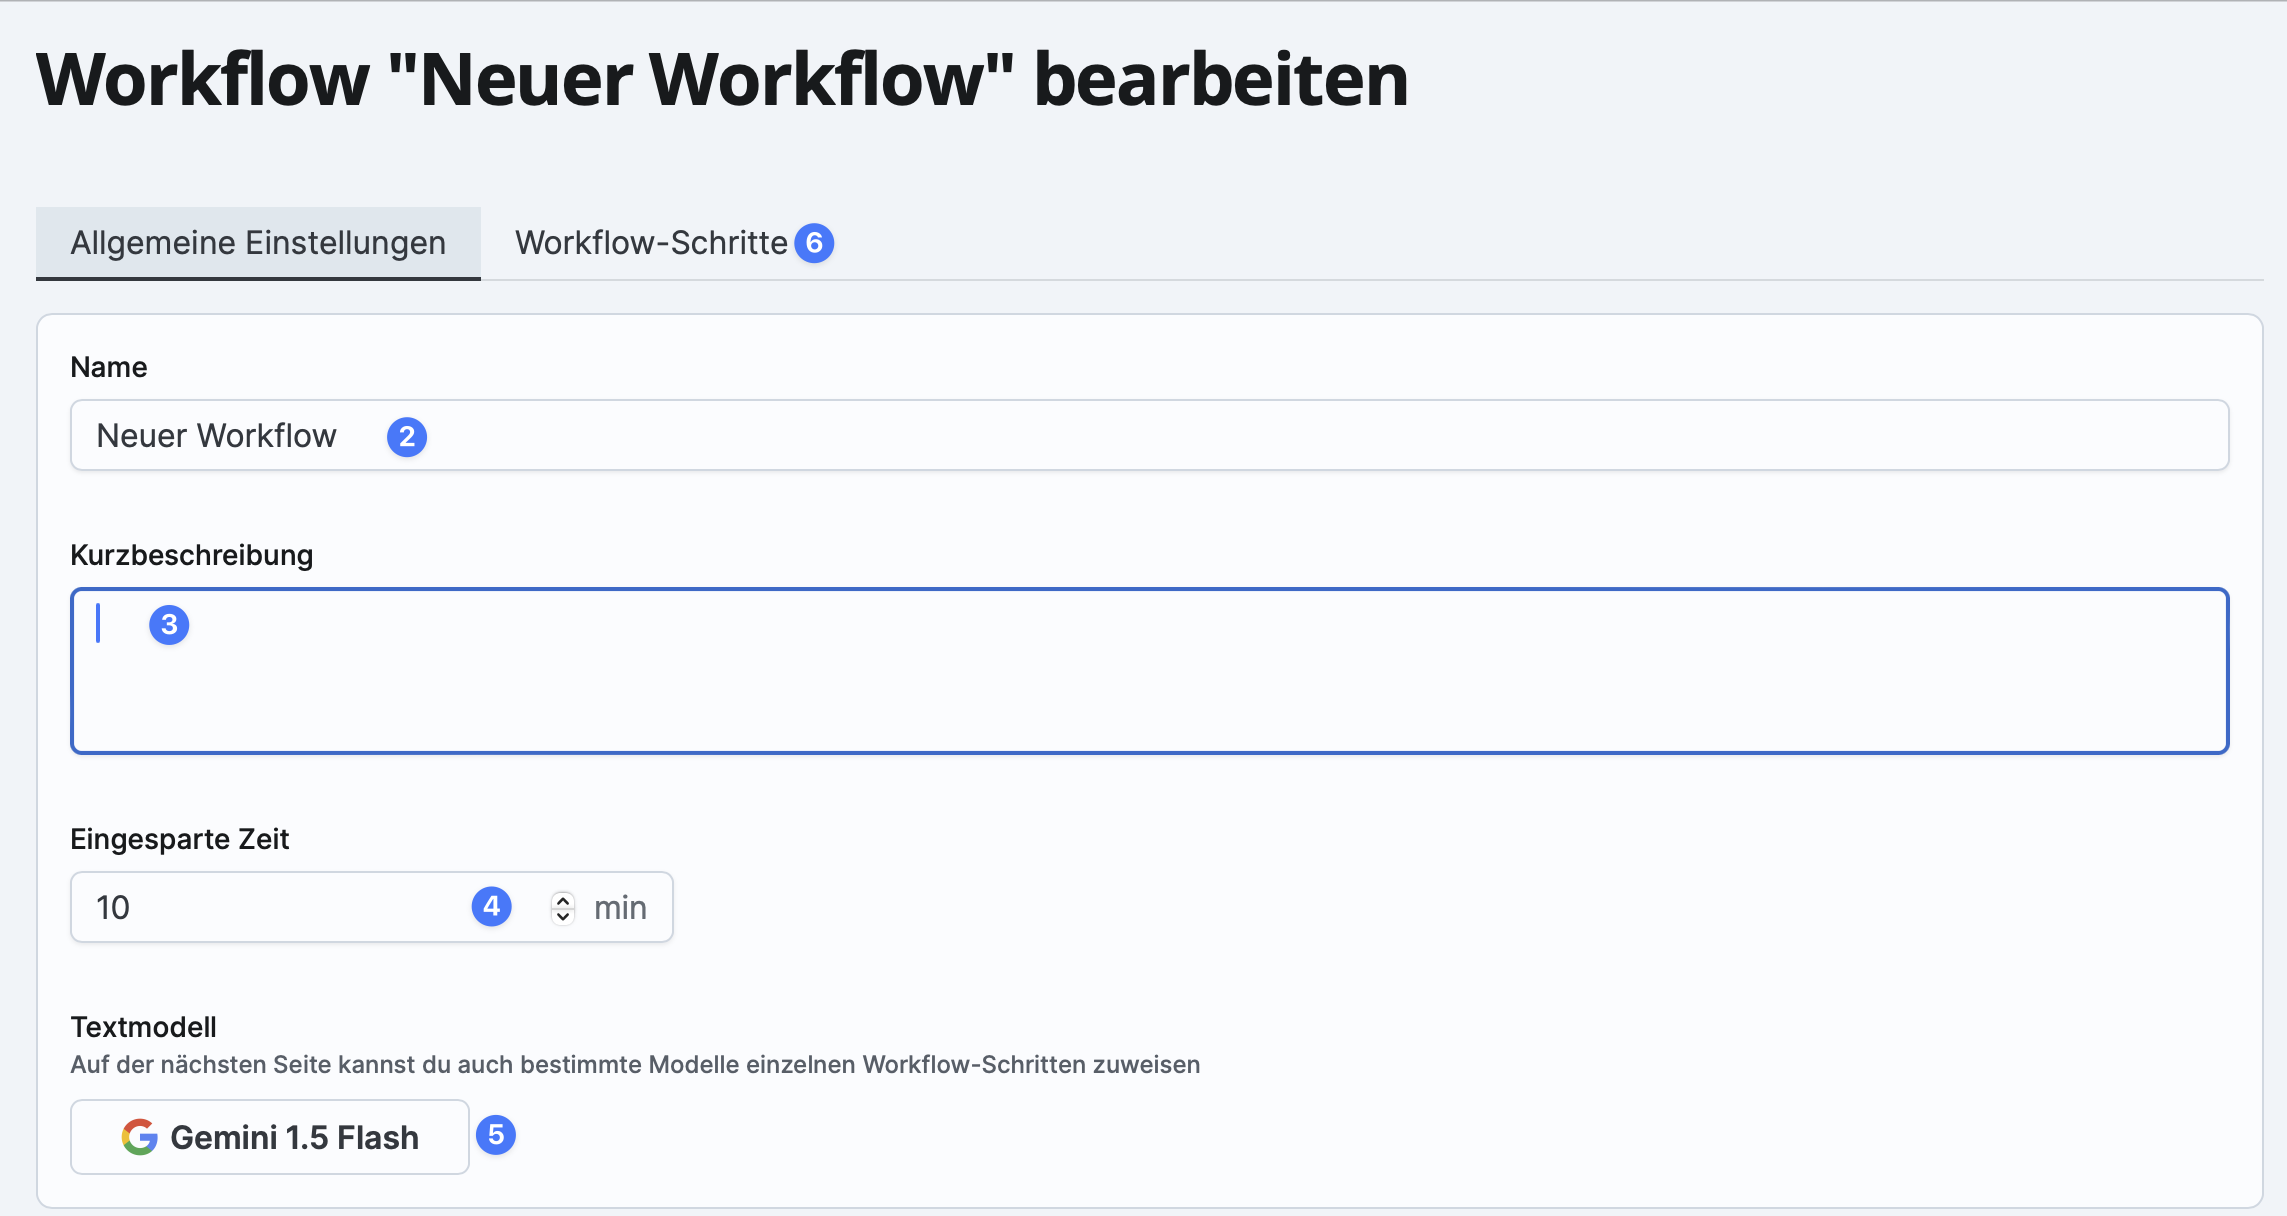
Give the workflow a clear, concise name in the Name field. This name should describe the workflow's purpose so it can be easily identified later.
Add Brief Description
Create a brief description for the workflow. This description helps you and other users to quickly understand the workflow's benefits and provides an overview of its function.
Optional: Set Time Saved
Enter an estimated time saved in minutes. This time should serve as a personal estimate of how much working time can be saved through automation with this workflow. This step is optional.
Select AI Model
Choose a general AI model for the workflow. This model will be used by default for all workflow steps unless other models are specified in individual steps.
Hinweis
In later steps, you can assign specific models to each individual step of the workflow. This allows you to combine the strengths of different AI models to achieve the best possible result. More information can be found in the Model Information.
Switch to Workflow Steps Section
After completing the general settings, switch to the Workflow Steps section. By clicking this section, you'll enter the configuration view where you can define individual workflow steps and determine how the AI should interact in each step.
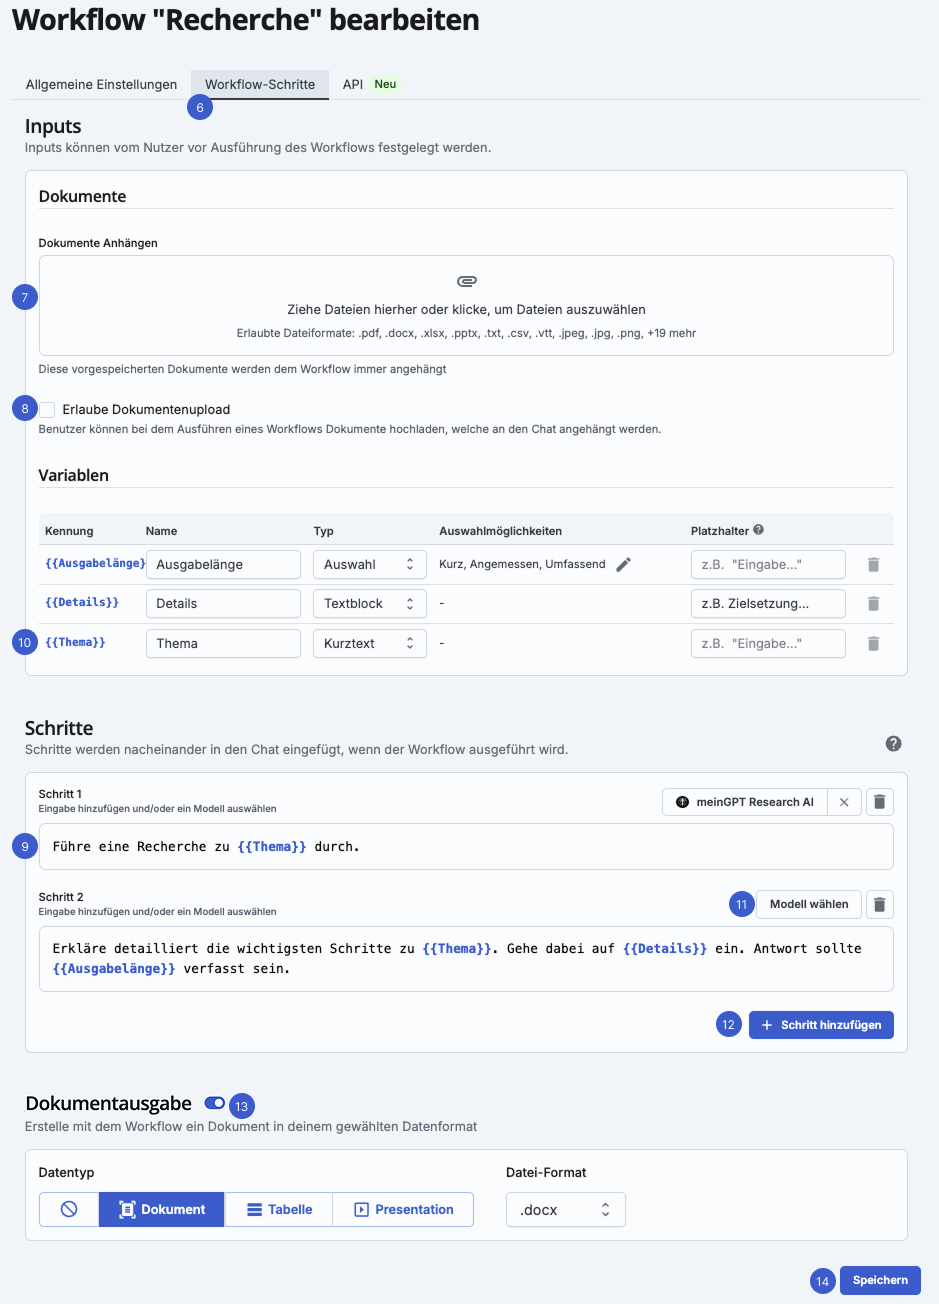
Store Documents
In this section, you can upload documents that will be automatically attached each time the workflow is executed. This is particularly useful when certain reference documents or templates are available to help the AI recognize the desired style or structure.
Hinweis
For example, you can upload a previously created sample job posting that serves as a reference for the AI and provides the desired structure. This document will then be automatically added every time the workflow is executed, allowing the AI to work optimally based on the example.
Allow Document Upload
Enable the "Allow Document Upload" option if the workflow needs additional documents that may vary with each execution. This function is helpful when users need to upload their own documents during workflow execution.
Hinweis
When creating a job posting, for example, a responsible department might regularly have changing requirements and specifications that need to be integrated into the workflow. By activating this option, such individual requirements can be considered.
Create Steps (Set Prompts)
A workflow consists of a series of steps that are executed sequentially. Each step represents a specific instruction or prompt that the AI processes to complete a subtask of the entire workflow. By adding multiple steps, the workflow can solve more complex tasks and deliver detailed results.
Hinweis
For example, a workflow for creating a job posting might include several steps, such as researching the professional field, creating an advertisement text, and summarizing the key qualifications.
You can individually formulate the prompt in each step and include variables to give precise and flexible instructions. Each step can access previously defined variables or documents to make the execution more specific and personalized.
Define Variables
Variables allow you to quickly and easily adapt the workflow to specific requirements with each execution without changing the basic process. They are displayed in the workflow using two curly brackets like {{Variable}} and can be flexibly used in individual steps.
Variable Components:
-
Identifier (Name): The name of the variable, e.g., {{Topic}}, used in the workflow steps.
-
Placeholder: A short hint text that shows the user what information should be entered in the variable. For example, the placeholder "e.g., research topic" indicates what type of content is expected.
-
Type: The variable type determines what kind of input is required. You can choose between Short Text, Text Block, Selection, and On/Off.
The Short Text Variable is an input type designed for brief, concise information, such as names, titles, or keywords. It allows the user to enter a short text, usually consisting of a few words or a sentence. This variable is excellent when the workflow needs a clear, specific input that can be captured quickly without extensive description.
Adjust Models for Individual Steps
In addition to the general model that applies to the entire workflow, you have the option to assign a specific AI model for each step. This feature is particularly valuable when individual workflow steps have different requirements. For example, a step that relies on high creativity can use a different model than a step that focuses more on technical precision.
Optional: Enable Web Search per Step
You can toggle web search independently for each step. This is helpful when only certain steps need live information from the internet (for example, research in the first step), while later steps work purely on the previous output.
Add Additional Steps
If the workflow consists of multiple steps, you can add as many additional steps as needed. This allows you to create comprehensive workflows that perform multiple actions in sequence and handle complex tasks.
Each additional step can use new variables or refer to previously defined variables. This way, variables defined in step 1, for example, can be reused in subsequent steps to ensure consistency and customization of the workflow execution.
Document Output
When document output is enabled for a workflow, a document with the output in the chosen format is automatically created after execution.
Available formats:
- Document (Word, PDF, Text)
- Spreadsheet (Excel, CSV)
- Presentation (PowerPoint)
- Structured JSON (machine-readable output, ideal for downstream processing via the Workflow API, Make, or n8n)
The generated document remains in the chat and can be downloaded at a later time.
Hinweis
Branding template is applied. If an admin has configured a document template (logo, header, footer) under Settings → Branding, it is automatically applied to the document output. Word and PDF outputs look like your official company documents without any manual formatting.
Achtung
PowerPoint and Excel output only work via document output in workflows. You cannot generate .pptx or .xlsx files from a normal chat.
Save the Workflow
Once you have defined all steps and settings for the workflow, it's important to save the workflow. This is done by clicking the Save button. Saving ensures that all changes and configurations are permanently applied and the workflow is ready for execution.
Achtung
Every change to the workflow must be confirmed by saving again. If the workflow is not saved, all unsaved changes will be lost and the workflow remains unchanged. Therefore, make sure to click "Save" after each adjustment or addition to secure the latest version.
Running and Editing Workflows
Running Workflows
Select Workflow
Navigate to the desired workflow in the side menu and select it. This opens the workflow view.
Fill in Variables
If the workflow contains variables, input fields for the variables will be displayed. Fill in the corresponding values to adapt the workflow to current requirements.
Execute
Click the "Execute" button. The workflow starts and automatically executes the individual steps. Once the workflow is running, you don't need to take any further steps; the AI takes care of the rest.
Editing Workflows
Edit Workflow
Hover over the desired workflow in the side menu. An "Edit" button will appear. Click on it to open the workflow in edit mode.
Make Changes
In edit mode, you can change the desired points, such as variables, documents, or other workflow settings.
Achtung
Don't forget to always save your changes.