Input area
Model selection, the "+" menu for sources and tools, voice input, sharing a chat and comfort features.
The input area is where you set what the model answers with: the AI model, sources and tools via the "+" menu, voice input and sharing a chat.
Send and stop a response
Clicking the arrow on the right of the input field sends your prompt. While the model is answering, the same button turns into a square icon labeled Cancel - clicking it stops the running generation right away. The text already generated stays as a message; the model simply stops writing further.
How to tell whether something is still running. Before any output is visible, a time indicator with a seconds counter runs at the top of the emerging message; the text beside it moves from "Thinking" through "Still thinking" to "Hmm, this one takes a bit longer". As soon as the first text appears, the counter stops and is replaced by the fixed "Thought for X s" line - even if the model keeps writing afterward. To tell whether anything is still running overall, the send button is the reliable signal: as long as it reads Cancel, the model is still generating; once it turns back into the arrow, the response is complete. The "Thought for X s" line stays visible even after a page reload. If the response uses tools like web search or several agent steps, the wait can grow noticeably longer – each intermediate step runs one after another before the actual answer appears. As long as the send button reads Cancel, a longer wait isn't a sign of a stuck chat, just normal behavior when several tool calls are involved. More on the step limits: Maximum number of agent steps reached.
Editing a message and regenerating a response
The pencil icon next to one of your own messages opens Edit Message; the regenerate icon under a model's response regenerates that answer (Regenerate). Both work anywhere in the chat — including in the middle of the conversation. Editing is unavailable for your own messages that contain @-mentions, and while your workspace's subscription is inactive.
Attention
If you edit or regenerate a message that is not the last one in the chat, every message that came after it disappears from the visible history — even if those messages covered completely different topics. There is currently no way to switch back to the earlier version (no version history, no "1/2" navigation). Before continuing from an earlier point in the chat, copy out anything important from the later messages, or start a new chat instead if you want to keep the full history intact.
Model selection
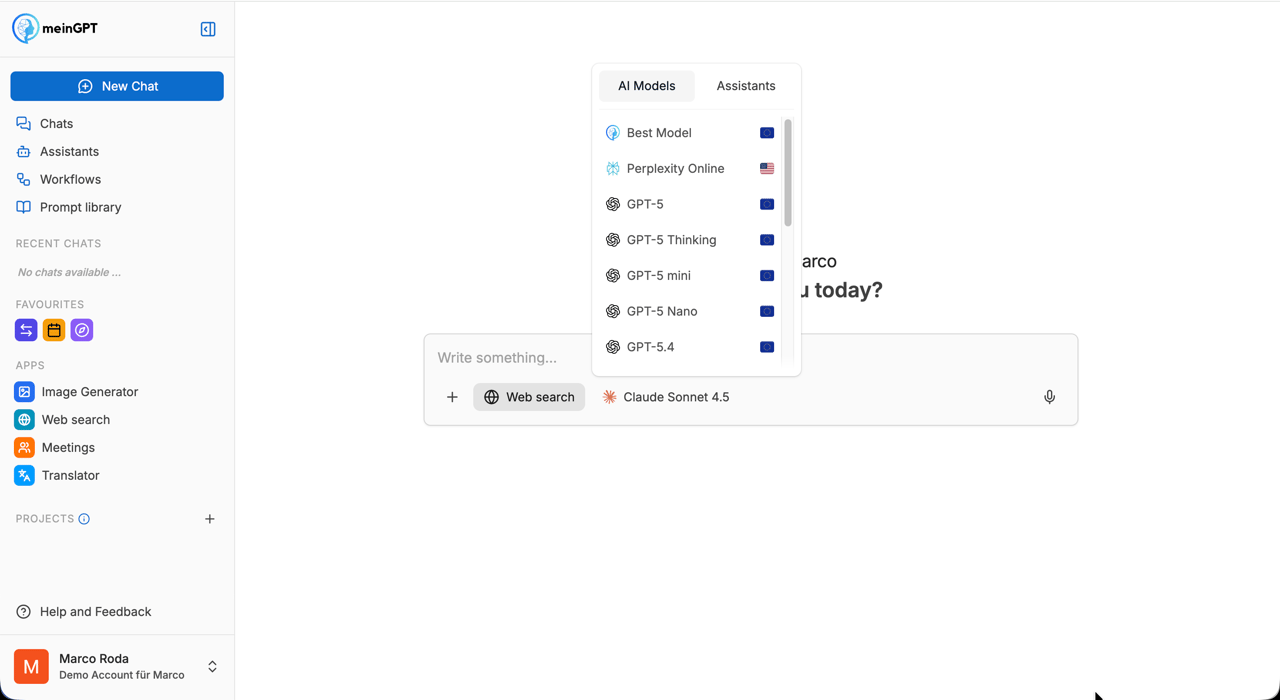
Per chat, you choose the AI model that should answer the request. Depending on your workspace configuration, models from OpenAI, Anthropic, Google, Mistral and others are available. An EU flag next to a model indicates that it is hosted in an EU region and is GDPR-compliant. Reasoning models (with "Thinking" or "Reasoning" in the name) deliver more thorough results for complex tasks but take longer and consume more credits.
More on the model selection and which model fits when: AI Models.
The "+" menu: sources and tools
To the left of the input field, the "+" opens a menu that brings all sources and tools together in one place. It is organized into three blocks.
Sources
-
Upload files or images – adds a file or image directly to the chat, via the menu or by dragging and dropping it anywhere onto the chat area, not just onto the input field; while dragging, an overlay reading "Drop files here" shows the allowed formats and the applicable limit. The content is sent along to the model so it can read, summarize or analyze it. For files such as PDF, Word, and txt, the text is extracted for this, layout and formatting are lost in the process - for spreadsheet analysis with precise calculation results, the Code Sandbox is more reliable because it processes the file directly instead of reading it as text only.
File and image upload limits
- You can attach a maximum of 50 files per chat (documents and images combined). This limit applies the same way across all workspace types - it currently can't be increased individually, including under an Enterprise contract.
- For files such as PDF, Word, and txt, the text is extracted, layout and formatting are lost in the process. For spreadsheet analysis with precise calculation results, the Code Sandbox is more reliable because it processes the file directly instead of reading it as text only.
- Only JPEG, PNG, WEBP, and GIF are processed directly as images by the AI models. Vector formats such as SVG aren't among them. There's also a limit on the combined size of all attached images – see Image too large for details. Other image formats, for example TIF/TIFF, can be uploaded but aren't read by the AI models. Convert such files to PDF, PNG, or JPG before uploading.
- Non-image files (PDF, Word, txt, …) are limited to 50 MB per file. A larger file is rejected right at upload with the notice "The file is too large. Maximum size is 50 MB", before it's ever sent to the model.
- Documents over 50 MB: The limit cannot be raised individually and MeinGPT does not compress documents itself. Reduce the file first (for example "Reduce file size" in your PDF tool, or lower the image resolution in scans) or split it into parts of under 50 MB. For large document collections, set up a data source instead of attaching files, so the content is searchable in chat. Files read through an Outpost have their own limit of 32 MB per file (10 MB for
.txt,.md, and.rstfiles).
Removing uploaded files
As long as you have not sent the message yet, you remove an attached file with the remove button on its card in the input area - it is permanently deleted. On a message that has already been sent, the file card has no delete button in the interface, and Delete chat does not remove the files either, because the chat is only archived. This also applies to files an assistant generated in the chat. Files you added to an assistant as knowledge are removed in the assistant editor.
-
Search a data source – sets which source set up in your workspace (such as a knowledge base or a connected drive) the chat searches. This entry appears once data sources exist in your workspace; they are set up by your administration – more on this under Data Administration. If no source is connected yet, only workspace admins see the Add data source entry instead, which leads to the settings.
Note
A data source shows no checkmark in the "+" menu even though the assistant is already using it? If the assistant already has a data pool assigned in the editor under Knowledge, that pool is part of its configuration and available to it regardless of whether you additionally select it here via "Search a data source". A missing checkmark in this list therefore does not mean the data pool is inactive - it only shows whether you've additionally selected it for this one chat. "Search a data source" is for selecting a source just for this chat that the assistant wouldn't otherwise search - not for activating a knowledge source the assistant already has attached.
Without a selection, a normal chat without an assistant only searches data sources when automatic search is on. Your admins decide whether it is. If they leave it to members, you turn it on yourself in the "+" menu via Search data sources automatically. When it is on, the model can use every data source you are allowed to use and decides per question whether to search them. If you are a workspace admin, this includes every data source in the workspace, even unshared ones. If you pick a source via Search a data source, the chat searches only that source, even when automatic search is off. If the chat runs with an assistant, it searches only the assistant's sources (and any you add here).
-
Prompt library – inserts a saved prompt from the Prompt Library straight into the input area. If the prompt has variables, the library asks you for the values and substitutes the placeholders automatically. Useful for recurring requests where the structure stays the same.
-
Project for this chat – attaches the chat to a project so the agent can access its tables. This entry appears once your workspace has projects with tables.
Files loaded by the assistant appear in the input field
When an assistant loads a file into the chat during a conversation – for example from OneDrive, SharePoint, Google Drive or a data source – it then appears above the input field as an attachment card, just like a file you uploaded yourself. This is intended: the card shows that the file belongs to the chat. It is sent with your next message and stays in the chat as an attachment of that message. There is no setting to hide these cards.
Attention
The × on the card doesn't just hide the file, it deletes it from the chat. Remove a card only if the assistant no longer needs the file. If needed, ask it to load the file again.
Tools
- Web search – allows the model to research on the internet. It formulates its own search queries, loads the relevant pages and shows the sources used with a preview (title, description, favicon) so you can immediately tell what the answer is based on. More details (number of sources, passing a URL directly, prompting tips): Web Search.
- Meetings, directly below Web search, opens a searchable list of completed meetings you can access. Select a meeting to attach its transcript to the chat. Dates and times help distinguish meetings with identical names. You can also type
@in the input area and choose Meetings, or search for a meeting directly. Longer lists scroll; Load more meetings shows older meetings. Search all meetings turns general meeting search on or off for the chat: the model searches accessible meetings based on your question without attaching every meeting. - Slides – turns your prompt into a presentation, optionally based on a template. More on this under Slides.
- Image generation – lets the model create images for your prompt. More on this under Image Generator.
- Tables – signals to the model that it may understand, create and work with spreadsheets when you ask for it in the chat. The actual table work runs through the Code Sandbox.
- Artifact mode – treats longer texts, reports or email drafts as their own document instead of a message in the history. Three settings: Auto, Enabled and Off. Active artifacts appear as a separate panel next to the chat and can be downloaded as PDF, Word, Excel, or Markdown. More details: Artifacts.
Connectors
At the bottom of the menu you connect and manage Connectors – such as Google Workspace, Outlook or other connected systems – directly from the chat.
Note
Which tools appear depends on the workspace configuration. As soon as you enable a tool, it shows up as a small chip next to the input field; use the × on the chip to switch it off again.
Bring in assistants and more with @
Type @ in the input field to pick an assistant, a workflow, a saved prompt from the prompt library, a data source, a connector or a meeting right inside your message. If you pick an assistant, it is inserted as an @-mention and used for that one message – you don't have to leave the chat. Afterwards the chat's own setting applies again. Which entries appear depends on your permissions and the workspace configuration.
Voice input (microphone)
Click the microphone icon to dictate your prompt instead of typing it. The language is detected automatically, transcribed, and inserted into the input field. Handy for longer prompts, when multitasking, or when typing isn't practical.
As with speech recognition in general, transcription can occasionally insert a word or short phrase you didn't actually say - usually during silence or very quiet audio at the end of a recording (for example, an added "thank you"). Review the transcribed text before sending, especially after longer recordings.
Allow or re-enable microphone access
The first time you dictate, your browser asks whether MeinGPT may use the microphone. Choose Allow. If you declined or dismissed the request, the browser may not ask again, and MeinGPT shows "Recording failed. Please make sure you have granted microphone permissions and try again." In that case, re-enable access in the browser settings and then reload MeinGPT:
- Chrome and Edge (computer): Click the icon to the left of the address in the address bar, open the site settings and set Microphone to Allow.
- Safari (Mac): In the menu bar choose Safari → Settings for This Website and set Microphone to Allow.
- Safari (iPhone and iPad): Tap aA in the address bar, choose Website Settings and set Microphone to Allow or Ask. Alternatively open iOS Settings → Apps → Safari → Microphone (on older iOS versions, Safari sits directly under Settings).
Share a chat
Activate the share toggle and generate a link to send to colleagues or to support. Recipients see the chat exactly as you shared it. Useful for best-practice libraries within a team or for support tickets where the agent needs to see the full conversation.
Comfort features
Input draft persistence
A prompt you haven't sent yet stays in the input field even after a page reload. The draft is stored locally in the browser. Particularly useful for long prompts or when F5 was hit by accident or the tab was closed.
Sources with preview
When the model uses web search, the sources appear with title, description and favicon. You can tell at a glance whether a source is trustworthy, without having to open it.
Rotating placeholder suggestions
The empty chat input shows rotating placeholder suggestions like "Summarize this PDF" or "Build me an Excel breakdown". They lower the entry barrier for new users and give inspiration when you don't know where to start.
Context window indicator
On the right of the input field, a small circular indicator shows how much of the currently selected model's context window the ongoing chat has already used. Clicking it opens the details: tokens used vs. available, plus the approximate character count. The color shifts as usage grows (orange from 50%, red from 80%), so you can switch models or start a new chat before running into the "Chat too large for the model" error.