---
title: "Create and Run Workflows"
description: "Create and use workflows for yourself and your colleagues"
canonical_url: "https://meingpt.com/en/docs/platform/workflows-create"
language: en
---
# Create and Run Workflows
Workflows on the meinGPT platform allow you to automate recurring tasks and
make processes more efficient. A workflow is a sequence of predefined steps
executed by the AI to solve complex tasks in a structured way. Each workflow
can be customized individually – from selecting the appropriate AI model to
defining specific variables and documents. This flexibility allows you to
precisely adapt the workflows to your team's or company's requirements and
save time and resources.
With workflows, you can map standardized tasks such as creating reports,
analyzing data, or summarizing information in clear, structured processes.
Each step of a workflow can access different models and inputs, allowing
optimal use of the various AI models' strengths.
## The Workflows page
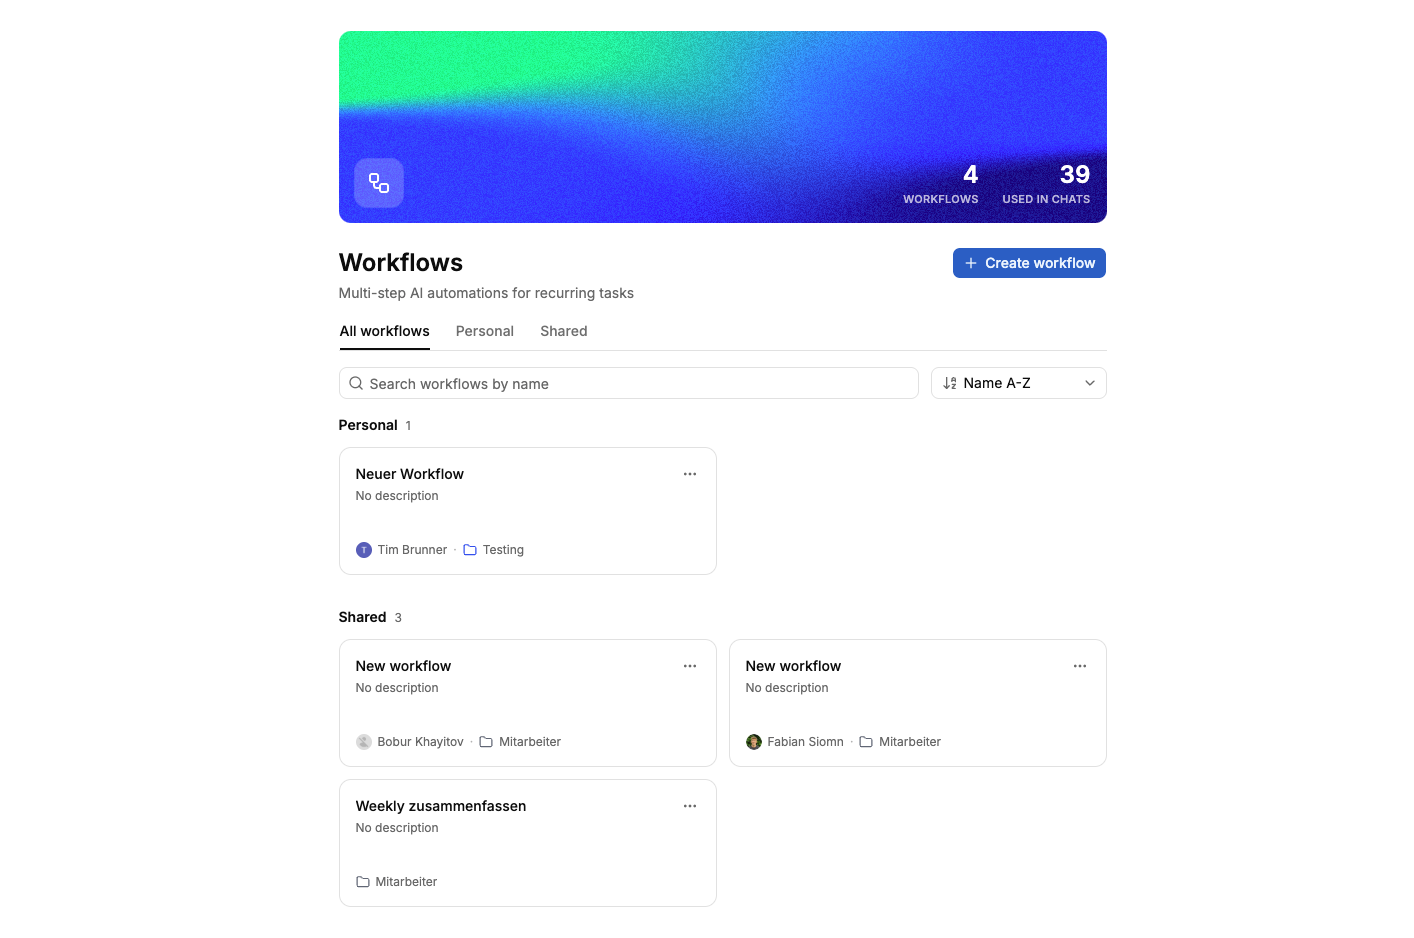 Go to **Workflows** in the sidebar to see every workflow you have access to. From here you can:
- **Search** workflows by name, description, or project.
- **Sort** alphabetically (A-Z or Z-A).
- Switch between **All workflows**, **Personal** (created by you), **Shared** (created by someone else), and **Examples** (ready-made workflows to try).
- Find workflows you've pinned in a dedicated **Pinned** section at the top.
## Creating a workflow
On the Workflows page, click **Create workflow**. If you have access to more than one project, pick which one the workflow should belong to — every workflow lives inside exactly one project.
Describe what the workflow should do in a sentence or two and click **Create with Buddy** — Buddy drafts the steps, variables, and output format for you, ready to refine afterwards.
Prefer to build it yourself? Click **Create manually** instead to open an empty workflow in the editor.
Either way, you land in the workflow editor to fine-tune the result.
## Setting up the workflow
Go to **Workflows** in the sidebar to see every workflow you have access to. From here you can:
- **Search** workflows by name, description, or project.
- **Sort** alphabetically (A-Z or Z-A).
- Switch between **All workflows**, **Personal** (created by you), **Shared** (created by someone else), and **Examples** (ready-made workflows to try).
- Find workflows you've pinned in a dedicated **Pinned** section at the top.
## Creating a workflow
On the Workflows page, click **Create workflow**. If you have access to more than one project, pick which one the workflow should belong to — every workflow lives inside exactly one project.
Describe what the workflow should do in a sentence or two and click **Create with Buddy** — Buddy drafts the steps, variables, and output format for you, ready to refine afterwards.
Prefer to build it yourself? Click **Create manually** instead to open an empty workflow in the editor.
Either way, you land in the workflow editor to fine-tune the result.
## Setting up the workflow
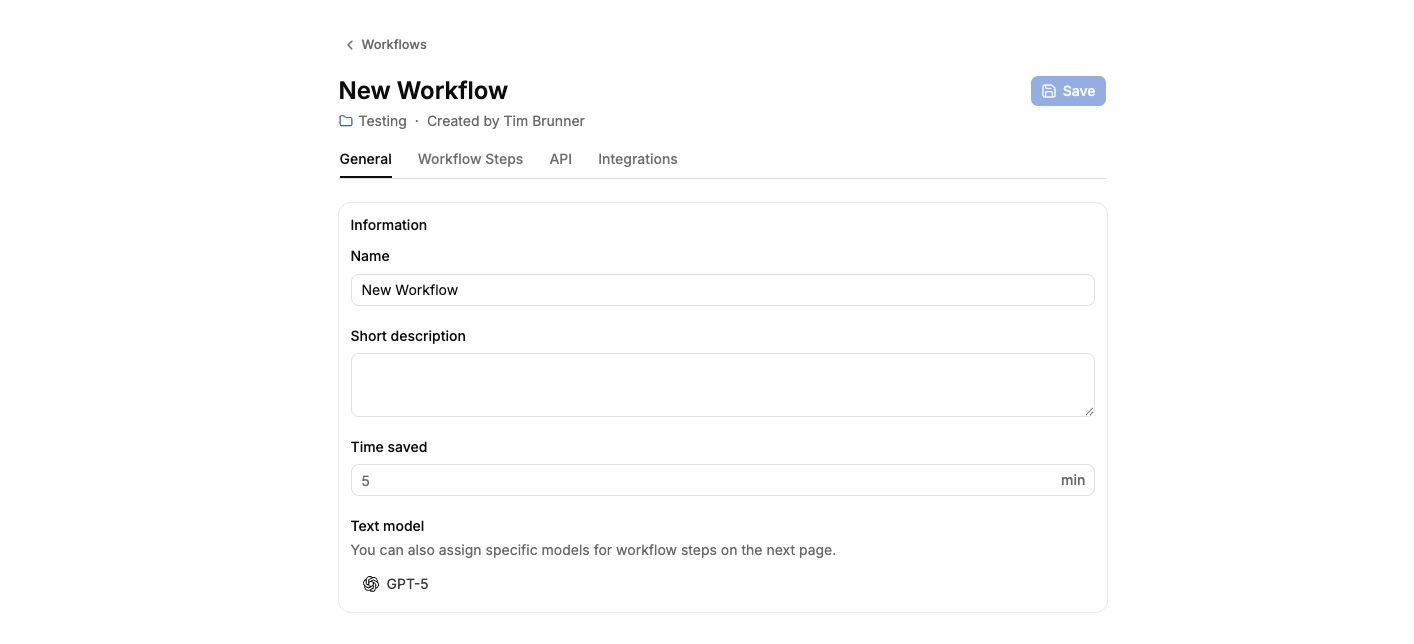 Give the workflow a clear name and a short description — this helps you and your colleagues recognize it later. Optionally, note how many minutes it typically saves per run; this is just your own estimate, purely informational.
Choose the text model used for the workflow's steps by default.
You can override the model for individual steps later — see below.
Give the workflow a clear name and a short description — this helps you and your colleagues recognize it later. Optionally, note how many minutes it typically saves per run; this is just your own estimate, purely informational.
Choose the text model used for the workflow's steps by default.
You can override the model for individual steps later — see below.
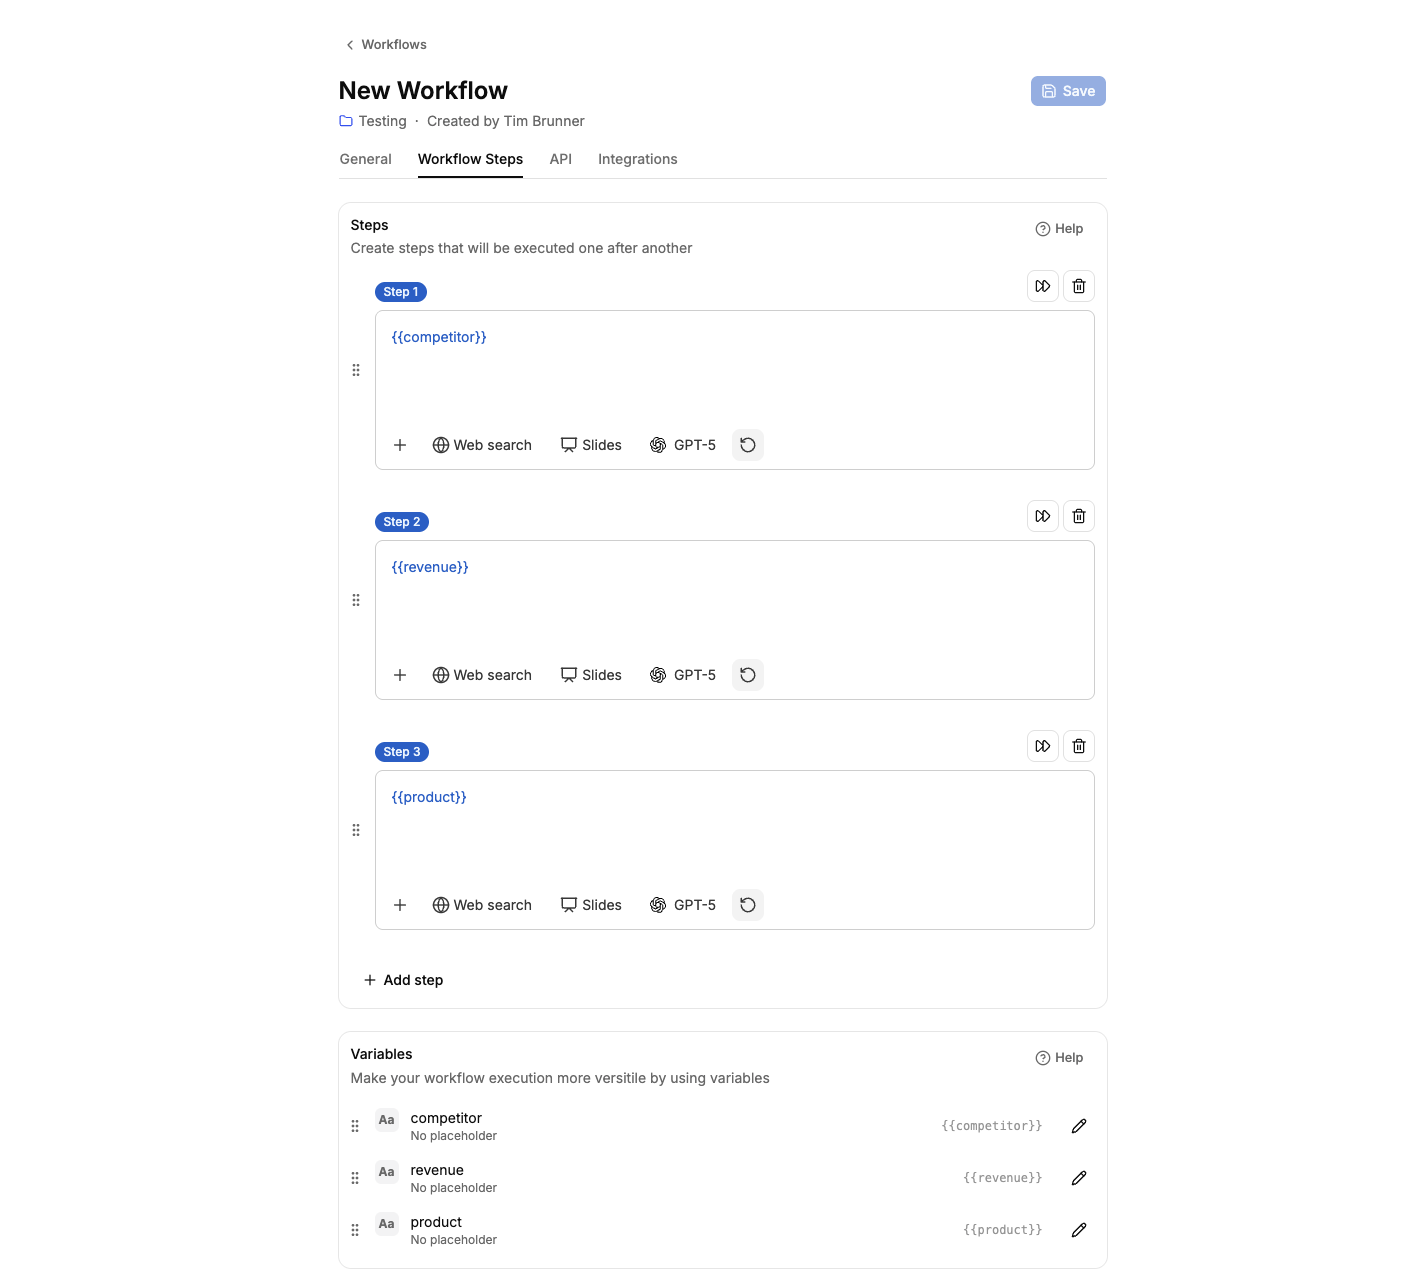 This is where you write the actual prompt(s), define variables, attach documents, and set the output format.
A workflow consists of one or more steps executed in sequence. Each step is a prompt the AI processes to complete part of the task — later steps can build on earlier steps' output. Add more steps for more complex, multi-part tasks.
Variables let you adapt the workflow to each run without changing the underlying prompt. They're written as
This is where you write the actual prompt(s), define variables, attach documents, and set the output format.
A workflow consists of one or more steps executed in sequence. Each step is a prompt the AI processes to complete part of the task — later steps can build on earlier steps' output. Add more steps for more complex, multi-part tasks.
Variables let you adapt the workflow to each run without changing the underlying prompt. They're written as \{\{Variable}} and can be used in any step.
### Short text
For brief input like a name, title, or keyword.
### Text block
For longer, more detailed input — instructions, descriptions, or freeform context.
### Selection
Offers a fixed list of options to pick from, so the input stays consistent across runs.
Each option has a **label** (what the user sees) and a **value** (what's used internally, and what appears in the prompt).
### On/Off
A simple toggle for a yes/no decision — each state can carry its own piece of prompt text.
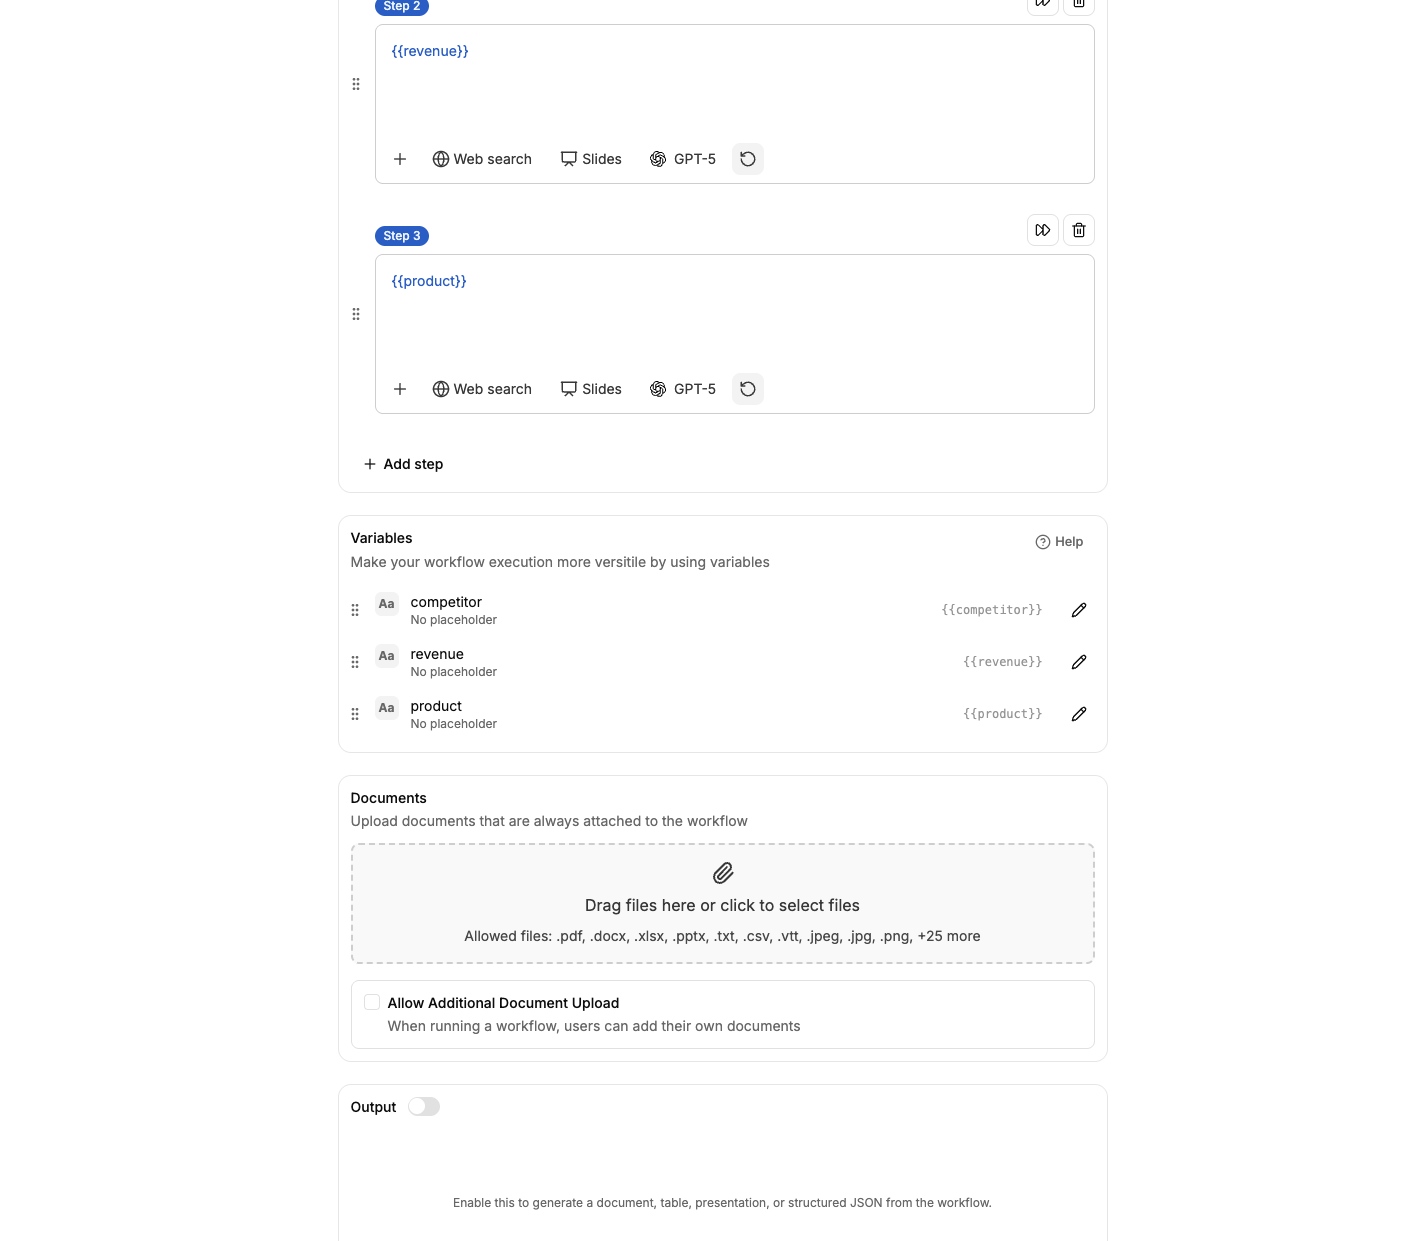 Upload documents that should always be attached when the workflow runs — for example, a sample document that shows the AI the tone or structure you want.
Separately, you can allow **additional document upload**, so whoever runs the workflow can attach their own file for that specific run.
**Encrypted or rights-managed PDFs aren't read.** If an uploaded PDF is password-protected or carries a rights-management (DRM) profile, meinGPT can't read its content - the model then receives no text, or only partial text. Remove the password protection, or export the document without the DRM restriction, before uploading it here or when running the workflow.
Each step can use a different model than the workflow's default — useful when one step needs more creativity and another needs precision. You can also toggle **web search** independently per step, for example only on a research step, while later steps just work off its output.
Turn on document output to have a formatted file generated automatically once the workflow finishes:
* **Document** (Word, PDF, Text)
* **Table** (Excel, CSV)
* **Presentation** (PowerPoint)
* **Structured JSON** (machine-readable output, ideal for downstream processing via the [Workflow API](/en/docs/api/workflows), Make, or n8n)
The generated document remains in the chat and can be downloaded at a later time.
**You have to pick a branding template yourself.** If an admin has configured a document template (logo, header, footer) under **Settings → Branding**, it isn't applied automatically. Select it here in the **Template** field from the list — as long as it's set to **No template**, the output comes out unformatted, without branding.
Click **Save** in the page header, or press **Cmd/Ctrl+S** from anywhere in the editor.
**Every change** must be saved. If you navigate away without saving, your changes are lost.
## Where the Workflow Wizard often trips
### Output without a schema
*Symptom:* Looks fine on the first test; a colleague gets a different format a week later and complains.
*Cause:* The prompt says *what* to produce but not *in which shape*. Models vary across runs in length, ordering, bullet style.
*Fix:* Spell out the output schema in the prompt as a list of sections or a sample table. If applicable, enable document output — `.docx`/`.xlsx` enforces a fixed structure.
### Too many steps in a row
*Symptom:* Steps 1-3 are usable; from step 5 onward the topic drifts or variables from step 2 are ignored in step 6.
*Cause:* Each step receives the output of the previous steps as context. Past 6+ steps the context grows long and the model loses the original task.
*Fix:* Keep workflows to 3-4 steps max. If you need more: split into two workflows — the second takes the first's result as a file input.
### Wrong granularity — too specific or too generic
*Symptom A:* The workflow works only for one customer / one product — the second use case requires rebuilding it.
*Symptom B:* The workflow is so generic that you end up retyping half the prompt on every run anyway.
*Cause:* During design, the *axis of variation* was never decided. Should the workflow vary across roles? Across departments? Across tones?
*Fix:* Before building, write down: "N people will run this workflow. What changes per run?" — that becomes the variable list. Everything else stays hard-coded in the prompt.
### File upload without a format convention
*Symptom:* The requirement note is sometimes a PDF, sometimes an email, sometimes a whiteboard photo — results swing wildly.
*Cause:* The prompt implicitly expects a specific input format but never says so.
*Fix:* State explicitly in the prompt what the uploaded file contains and how it looks — e.g. *"The uploaded document contains bullet points on the requirements, half a page to one page, English"*. If the format is unclear, disable file upload and use a text-block variable instead.
**The trick — manual first, model second.**
Workflows don't replace an unclear process; they scale a clear one. Run the process **manually in chat three times** — with three different inputs — before saving it as a workflow. You'll notice which variables actually vary, where the prompt is too vague, and whether the model can deliver what you need at all. Jumping straight into workflow creation usually builds something that misses the real flow, and you only find out when colleagues start using it.
## Running, editing, and organizing workflows
### Running a workflow
On the Workflows page, click the workflow you want to run.
If the workflow contains variables, input fields for the variables will be
displayed. Fill in the corresponding values to adapt the workflow to current
requirements.
Click **Execute**. The workflow runs its steps automatically — once it's started, the AI takes care of the rest.
### Editing a workflow
Open the **⋯** menu on a workflow's card (on the Workflows page, or in the sidebar if it's pinned) and choose **Edit** — this is only available if you have edit rights on the workflow's project. Colleagues without edit rights can still run the workflow, just not change it.
### Organizing workflows
From the same **⋯** menu, you can:
- **Pin to sidebar** (or **Unpin from sidebar**) — pinned workflows get a shortcut in the sidebar and appear in the **Pinned** section on the Workflows page.
- **Move or duplicate** — move the workflow into a different project, or create a copy of it (including into the same project).
- **Delete** — permanently removes the workflow (requires edit rights).
## Frequent questions
### Can I version a workflow or roll back to an earlier version?
There is no built-in version history. For larger changes, duplicate the workflow (via the **⋯** menu → **Move or duplicate**) and edit the copy — that way the running version stays untouched for colleagues.
### Who can edit the workflow?
Workflows live inside a project. Anyone with edit rights on the project can change the workflow. Plain project members can run it but not modify it.
### How do I share a workflow with colleagues?
Workflows are shared via the project — add the colleague to the project and the workflow shows up for them under **Shared**. There is no separate workflow export. If a workflow is useful across several teams, place it in a shared project.
### Do workflows work with the on-prem Outpost?
Yes. Pinned reference documents and uploaded files are processed via the Outpost, just like in regular chats. You can pick the model per step — for sensitive data, choose a self-hosted model consistently.
Upload documents that should always be attached when the workflow runs — for example, a sample document that shows the AI the tone or structure you want.
Separately, you can allow **additional document upload**, so whoever runs the workflow can attach their own file for that specific run.
**Encrypted or rights-managed PDFs aren't read.** If an uploaded PDF is password-protected or carries a rights-management (DRM) profile, meinGPT can't read its content - the model then receives no text, or only partial text. Remove the password protection, or export the document without the DRM restriction, before uploading it here or when running the workflow.
Each step can use a different model than the workflow's default — useful when one step needs more creativity and another needs precision. You can also toggle **web search** independently per step, for example only on a research step, while later steps just work off its output.
Turn on document output to have a formatted file generated automatically once the workflow finishes:
* **Document** (Word, PDF, Text)
* **Table** (Excel, CSV)
* **Presentation** (PowerPoint)
* **Structured JSON** (machine-readable output, ideal for downstream processing via the [Workflow API](/en/docs/api/workflows), Make, or n8n)
The generated document remains in the chat and can be downloaded at a later time.
**You have to pick a branding template yourself.** If an admin has configured a document template (logo, header, footer) under **Settings → Branding**, it isn't applied automatically. Select it here in the **Template** field from the list — as long as it's set to **No template**, the output comes out unformatted, without branding.
Click **Save** in the page header, or press **Cmd/Ctrl+S** from anywhere in the editor.
**Every change** must be saved. If you navigate away without saving, your changes are lost.
## Where the Workflow Wizard often trips
### Output without a schema
*Symptom:* Looks fine on the first test; a colleague gets a different format a week later and complains.
*Cause:* The prompt says *what* to produce but not *in which shape*. Models vary across runs in length, ordering, bullet style.
*Fix:* Spell out the output schema in the prompt as a list of sections or a sample table. If applicable, enable document output — `.docx`/`.xlsx` enforces a fixed structure.
### Too many steps in a row
*Symptom:* Steps 1-3 are usable; from step 5 onward the topic drifts or variables from step 2 are ignored in step 6.
*Cause:* Each step receives the output of the previous steps as context. Past 6+ steps the context grows long and the model loses the original task.
*Fix:* Keep workflows to 3-4 steps max. If you need more: split into two workflows — the second takes the first's result as a file input.
### Wrong granularity — too specific or too generic
*Symptom A:* The workflow works only for one customer / one product — the second use case requires rebuilding it.
*Symptom B:* The workflow is so generic that you end up retyping half the prompt on every run anyway.
*Cause:* During design, the *axis of variation* was never decided. Should the workflow vary across roles? Across departments? Across tones?
*Fix:* Before building, write down: "N people will run this workflow. What changes per run?" — that becomes the variable list. Everything else stays hard-coded in the prompt.
### File upload without a format convention
*Symptom:* The requirement note is sometimes a PDF, sometimes an email, sometimes a whiteboard photo — results swing wildly.
*Cause:* The prompt implicitly expects a specific input format but never says so.
*Fix:* State explicitly in the prompt what the uploaded file contains and how it looks — e.g. *"The uploaded document contains bullet points on the requirements, half a page to one page, English"*. If the format is unclear, disable file upload and use a text-block variable instead.
**The trick — manual first, model second.**
Workflows don't replace an unclear process; they scale a clear one. Run the process **manually in chat three times** — with three different inputs — before saving it as a workflow. You'll notice which variables actually vary, where the prompt is too vague, and whether the model can deliver what you need at all. Jumping straight into workflow creation usually builds something that misses the real flow, and you only find out when colleagues start using it.
## Running, editing, and organizing workflows
### Running a workflow
On the Workflows page, click the workflow you want to run.
If the workflow contains variables, input fields for the variables will be
displayed. Fill in the corresponding values to adapt the workflow to current
requirements.
Click **Execute**. The workflow runs its steps automatically — once it's started, the AI takes care of the rest.
### Editing a workflow
Open the **⋯** menu on a workflow's card (on the Workflows page, or in the sidebar if it's pinned) and choose **Edit** — this is only available if you have edit rights on the workflow's project. Colleagues without edit rights can still run the workflow, just not change it.
### Organizing workflows
From the same **⋯** menu, you can:
- **Pin to sidebar** (or **Unpin from sidebar**) — pinned workflows get a shortcut in the sidebar and appear in the **Pinned** section on the Workflows page.
- **Move or duplicate** — move the workflow into a different project, or create a copy of it (including into the same project).
- **Delete** — permanently removes the workflow (requires edit rights).
## Frequent questions
### Can I version a workflow or roll back to an earlier version?
There is no built-in version history. For larger changes, duplicate the workflow (via the **⋯** menu → **Move or duplicate**) and edit the copy — that way the running version stays untouched for colleagues.
### Who can edit the workflow?
Workflows live inside a project. Anyone with edit rights on the project can change the workflow. Plain project members can run it but not modify it.
### How do I share a workflow with colleagues?
Workflows are shared via the project — add the colleague to the project and the workflow shows up for them under **Shared**. There is no separate workflow export. If a workflow is useful across several teams, place it in a shared project.
### Do workflows work with the on-prem Outpost?
Yes. Pinned reference documents and uploaded files are processed via the Outpost, just like in regular chats. You can pick the model per step — for sensitive data, choose a self-hosted model consistently.